Monday, February 21, 2011

Stevens Pass, Washington

As gold rushes go, the area to the west of Stevens Pass, Washington was just a minor footnote in western history. Located about 50 miles east of Seattle, the old mining districts were often located in remote, steep terrain, where rain and snow made conditions miserable. Today, few traces exist, yet there are still colors in several of the creeks, including my favorite, Money Creek.

In this article, I’ll describe a prospecting trip in late September, 2009 that took me to several different locales. I can update you on some of the road conditions, and maybe give you a few ideas of your own. The major producer in this general area was the Monte Cristo district, mostly wrapped up in the Alpine Lakes Wilderness Area and off-limits. So we hit it briefly, then concentrated on the next drainage south, along the Skykomish River, including Beckler River, Foss River, Miller River, Money Creek, the Sultan River, and the North Fork of the Skykomish.

Background

First, let’s understand where the area fits into historic gold mining in Washington, by consulting “old reliable” – U.S. Geological Survey Bulletin 610:

“Gold was first discovered in the state in 1853 in the Yakima River valley by a party under the command of Capt. George McClelland exploring for a possible railroad route (Huntting, 1955, p. 28). By 1855, prospectors were active in the Colville district, although the first discoveries were not made until 1883. In 1855, small placers were found along the Columbia and Pend Oreille Rivers. From the 1850s through the 1890s, placers were worked along streams in Okanogan, Whatcom, Chelan, and Kittitas Counties and along the major streams of the state – the Columbia and Snake Rivers. By 1900, however, most of the placer deposits were exhausted.” (Koschmann and Bergendahl, 1968, p. 260)

For Snohomish County, the authors have a little more detail of interest:

“In south-central Snohomish County gold was produced from several districts in the western part of the Cascade Range. These districts – Monte Cristo, Index, Silverton, Silver Creek and Sultan—are more or less contiguous and occupy an area about 10 miles wide and 20 miles long extending from about the center of the county south to the King County boundary…The Monte Cristo and Silverton districts produced most of the gold in the county. Patty (1921, p. 282) estimated that the combined early production of all metals, but mostly gold, from these districts was worth $7 million. From 1903 through 1956, production was 9,595 ounces of lode gold and 535 ounces of placer gold.

“Spurr (1901, p. 804-805) believed that ore deposition began in late Pliocene or early Pleistocene and continued to the Recent. The most important deposits are mineralized joints within or near tonalite masses. Ore minerals are galena, sphalerite, chalcopyrite, pyrite, and arsenopyrite. An upper zone, with is nearest the surface, contains galena, sphalerite, and chalcopyrite and is richer in gold and silver…” (p. 261)

So what does that mean? Basically, you’re looking for sulphides, including fool’s gold, or pyrite. Western Washington’s incessant rain will turn sulphides veins black by liberating sulphur, and sometimes you can even sniff out a pyrite-rich zone.

Here’s a rough map of the major gold areas we’re talking about, taken from the Gold Digger’s Atlas:

Figure 1. Gold districts near Stevens Pass, WA. Cick it to make it larger.

Monte Cristo

Area

Monte Cristo

GPS reading

48.01887, -121.44429

Land Status

US Forest Service

Activity

Panning

Warning(s)

Active claim near road;

Old mines on private land

Waterway

South Fork Sauk River

Nearest town

Darrington


Figure 2. Mountains near Monte Cristo.

The simplest way to reach Monte Cristo is to drive south from Darrington on the Mountain Loop Highway, which is actually a gravel road in its more remote stretches. There is plenty of camping in the area, with primitive spots throughout but also organized camps, especially out of Verlot. At Barlow Pass, you’ll usually spot many cars parked along the road near the trail head. Be sure to lock your valuables. You’ll need to hike about a half-mile, as there is an active claim along the S. Fk. Sauk River.

This GPS reading is right on the road; it’s the best early place to hike down to the water on the easy, level trail. There is a big jumble of mossy boulders; go a little further, and you should locate a trail to the river that is short and doesn’t take you through the underbrush. Gravels are extensive here. Look for traps up and down the river. Rockhounding material includes gneiss, schist, quartz, granite, marble, etc. We chose a spot at the head of a big gravel bar and found good black sand in the first pan, and color in the second pan. The quantity of the black sand and the size of the colors increased with depth. Fill in your big holes.

There are mines everywhere in the hills above the ghost town, but most are private. It’s a gorgeous area, great for a day hike to the town site of Monte Cristo, now barely recognizable. Rockhounds talk about decent quartz crystals at high elevation above Monte Cristo. We took a detour up to a famed garnet collecting area on Sloan Creek, out of Bedal, but the road was washed out and we ended up collecting small garnets until we lost the battle with horse flies near the Sloan Creek trail head.

Traffic gets heavy along this scenic highway during the summer, and many tight passing spots along the loop are dangerous. Not all drivers are as courteous as you’d like them to be. Heavy rains have washed out this road in the past, and there is no way to predict if the road will always be open; be sure to email or phone the Snoqualmie-Baker National Forest at Darrington any time you plan a trip up here.

Beckler River

GPS reading

47.73496, -121.33371

Land Status

US Forest Service

Activity

Panning for small garnets

Warning(s)

None

Waterway

Beckler River

Nearest town

Skykomish

The rest of the locales in this article are south of Monte Cristo, in the Skykomish drainage. We camped in the Beckler River campground, a very nice spot with no road noise from US Highway 2. An outcrop of garnet schist up river from the camp provides lots of garnets in the river gravels, and a little black sand, but we didn’t pull any colors from this locale.

A few years ago, the road looped from Skykomish, up Beckler River, then down to the Index area and back to Highway 2. In 2009, we ran into a sign that indicated the road was open only to local traffic when we were closing in on the old Galena area mines. This means that there is no public access to the Silver Creek district, which is a shame. On the other side of the loop, just outside of Index, the main road to Galena and Silver Creek is badly washed out, also preventing access. It’s a pity, because there is probably a good opportunity to pan from Silver Creek, and anyone interested in a challenging alpine hike can actually reach Monte Cristo by hiking up Silver Creek and across Poodle Dog Pass. Hopefully the road situation will improve in the future if there are enough forests to log up there.

Foss River

GPS reading

47.63053, -121.30924

Land Status

US Forest Service

Activity

Limited panning

Warning(s)

None

Waterway

Foss River

Nearest town

Skykomish


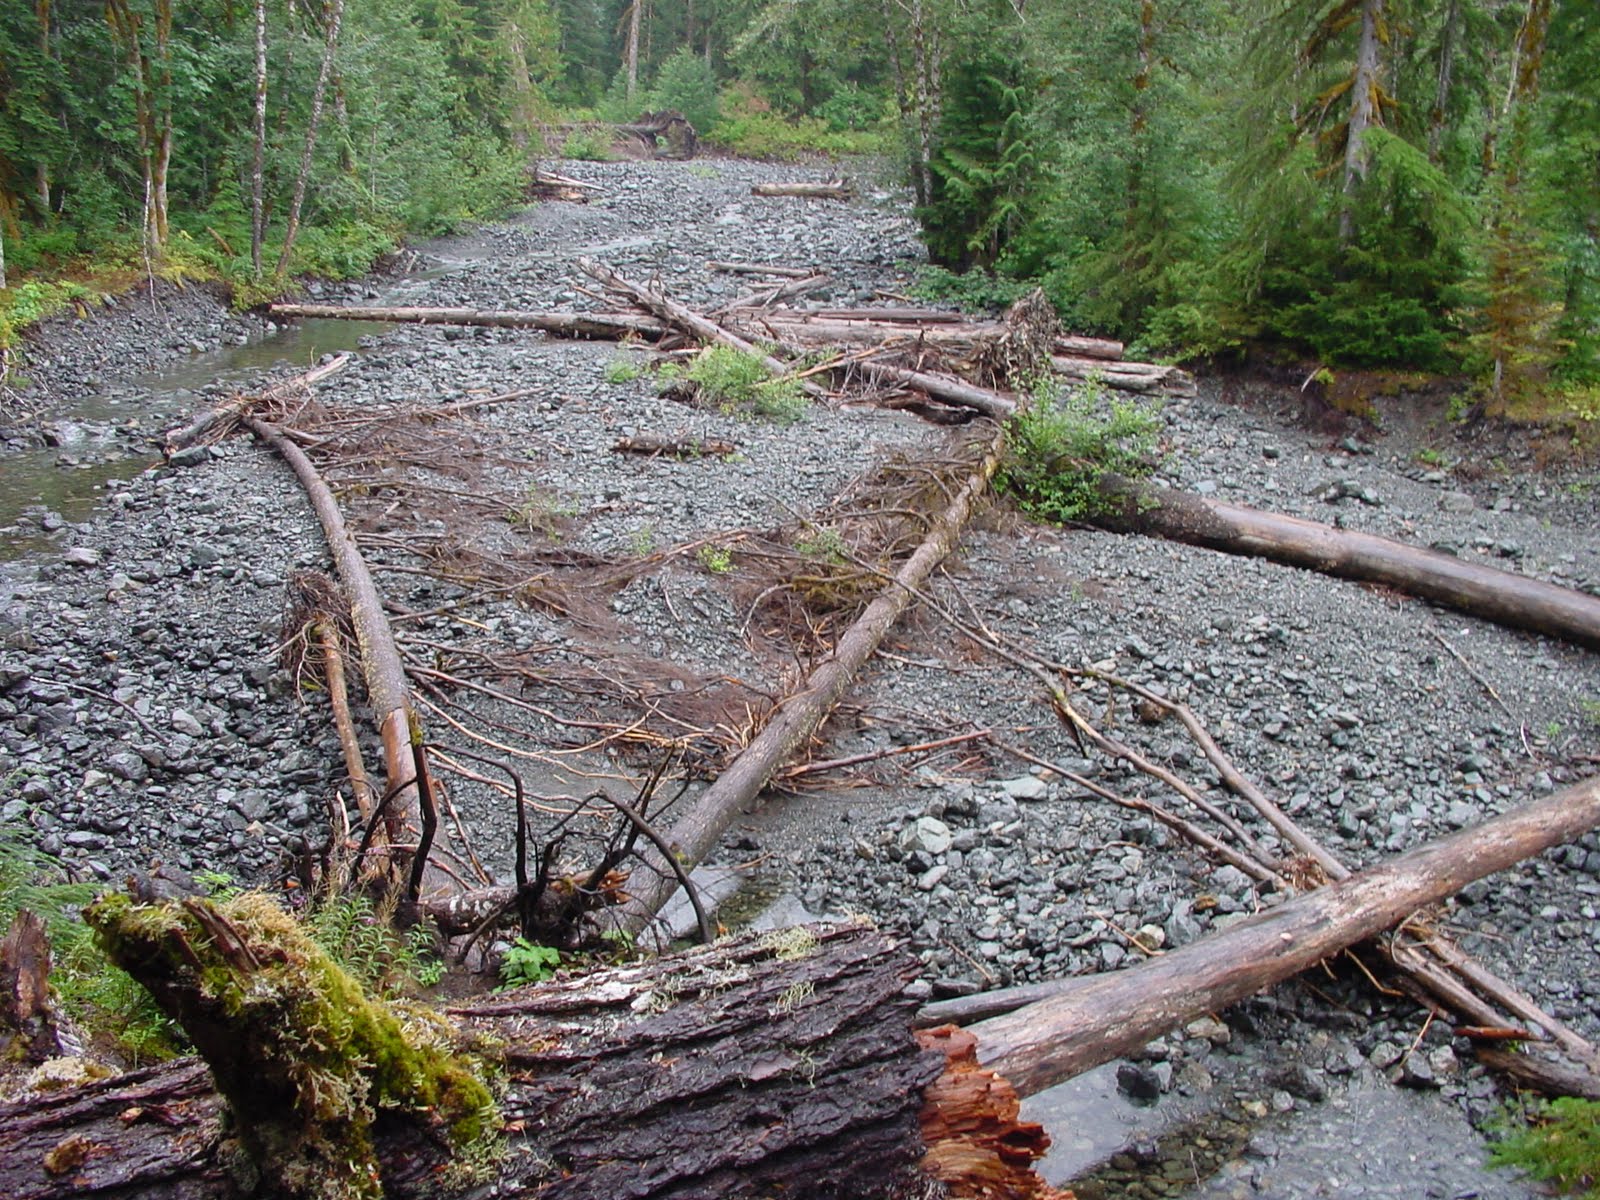
Figure 3. Foss River flood zone.

About two miles east of Skykomish (which has gas and a liquor store) the Foss River Road heads south into the steep mountains. We followed it (also known as NFD 68) for about 6.5 miles, until it dead-ended at the trailhead. There are two old mining claims along the Foss River that date from decades ago, located below Trout Lake. There were hard rock mines around Trout Lake, but the area is accessible only via hiking trail. We walked in a little less than a mile and found a likely spot on the river, but the panning wasn’t that great. We pulled a little black sand, but nothing to brag about, and not enough color to spur us to look harder or longer. Honestly, the area looked like it had witnessed a horrific flood, and most of the small sand was blown away. Before I completely cross it off the list I’d want to hike all the way to the old mines at Trout Lake, but it isn’t high on my list.

Miller River

GPS reading

47.71073, -121.39742

Land Status

US Forest Service

Activity

Panning, sluicing

Warning(s)

None

Waterway

Miller River

Nearest town

Skykomish


Figure 4. Entrance to the Mohawk Mine, near the Miller River.

To reach a good panning spot on Miller River, head west from Skykomish along the Old Cascade Highway about 2.3 miles until you see a left turn, south, on Miller River Road. This is NFD 6410. You’ll join up with the Miller River after less than a mile, and you can start looking for river access. Alternatively, you can turn off of US Highway 2 at the Money Creek campground turnoff, and you’ll see the turn onto Miller River Road after a mile.

We found good gravel bars that contained a tan-brown jasper, and some of it was so swirly that it is called picture jasper. What interested us were the boulders covered with moss, which we sampled with excellent results. There are also several decent bedrock traps, where the black sand was excellent, and the colors got better with depth. Unfortunately, the boulder we were carving under shifted and nearly claimed a miner, so we retired for lunch and moved on. Nobody said it was going to be easy.

Later, we hooked up with Daryl Jacobson of the group Northwest Underground Explorations. They’ve written three books on Washington underground mines, and each is a fabulous resource. Daryl helped us find the trail up to the Mohawk Mine, which was a small prospect along the Miller River. His group had been out recently, and there was flagging along the dim trail, so we easily found the entrance. The miners were apparently chasing a vein of blackened sulphides, and we got a couple samples before leaving.

There is excellent primitive camping throughout the area along Miller River, and the developed Money Creek campground is good, but has a little too much road noise for my tastes.

Money Creek

GPS reading

47.70719, -121.44274

Land Status

US Forest Service

Activity

Panning, sluicing, etc.

Warning(s)

none

Waterway

Money Creek

Nearest town

Skykomish


Figure 5. Mossy boulders along Money Creek.

This was the best spot of the bunch, which must be why it’s called Money Creek. To reach our spot, turn off US Highway 2 at Money Creek, go past the campground, over the railroad tracks, and about a mile from US 2, look for the sign for Miller River. As soon as you turn onto Miller River Road, look for Money Creek Road. This is NFD 6420. Take it for about 2.3 miles to reach our spot, but you can stop anywhere creek access looks likely.

We found more of the tan picture jasper in Money Creek, and petrified wood is reported from the gravels in this area. There is bedrock here, which makes for excellent gravity traps, and the moss mining and crevicing was fantastic. The black sand was abundant, and we got color with the first pan. Again, there is good primitive camping all along the creek, and the developed Money Creek campground is OK, just close to US 2.

If the road isn’t washed out, the Washington State Mineral Council used to mount an annual expedition to the Damon & Pythias Mine on NFD 6422. If you enjoy going underground, your best option is to hook up with WSMC because they get the right keys to the right gates and get to swing their picks in the mine itself. There is nothing like seeing a little pinpoint of daylight at the end of a long mine tunnel, if you’ve never experienced that sensation.

Sultan County Park

GPS reading

48.01887, -121.44429

Land Status

US Forest Service

Activity

Light panning

Warning(s)

No dredging in the park

Waterway

Sultan River

Nearest town

Sultan

Because the water was low and there wasn’t much going on, we stopped at the county park right on the Sultan River, practically in “downtown” Sultan. Take Albion Street north into the park, and angle over to where the river forms a nice elbow. There is an impressive little gravel bar there, and for many folks, this is about as close as you’re ever going to get to the Sultan placers. Since it’s a park, we didn’t go crazy, but we dug a couple holes on the inside bend of the elbow and panned out a lot of black sand before the rain drove us off. This is one of those spots where you might draw a crowd, you’d have to fill in your holes completely, and you might even make a good show of picking up some litter.

The problem with the Sultan River is access. We wanted to hook up with the Washington Prospectors and have them show us around the Sultan basin, but we managed to choose one of the wettest weekends of the year, so those plans fell apart. Way back when I was in graduate school at the University of Washington my wife signed me up for a non-credit gold panning class as a birthday gift. The class met at Horseshoe Bend, on the Sultan River, below the canyon and the dam. It’s on private utility land, and was open back then, but for the last ten years Horseshoe Bend has been off-limits. The spot was listed in old GPAA Claims Guides in the mid-1990s, but again, it is no longer open.

In fact, the best spots on the Sultan are claimed up by the big Washington club, and they wince every time the local magazines and newspapers write a story about weekend panners and the high price of gold. The inevitable result is that too many folks come out, end up getting lost or confused, accidentally trespass or claim jump, and generally cause problems. So I didn’t even stray up the Sultan, and I don’t advise that you do, either, unless you join the club first.

Sultan Bridge

GPS reading

47.86002, -121.81380

Land Status

US Forest Service

Activity

Panning

Warning(s)

Bit of a hike

Waterway

Skykomish River

Nearest town

Sultan


Figure 6. Short beach near Sultan bridge.

Barring access to the Sultan River itself, you can do some decent panning around the point where the Sultan dumps its load near the Sultan Bridge. You should be able to spot a fisherman’s access and parking area just across the Skykomish River from Sultan. At 5th Street, cross the river on Ben Howard Road, but once you reach the other bank, look for the parking area. There are two trails from the lot – one goes more or less northeast, while the other goes northwest. We tried the northeast route first and reached a steep bank with a small beach, and what looked like the pilings to an old bridge. Just for grins, we scraped some moss into a plastic bag someone had littered, and when we got it back to camp, we washed the moss in a five-gallon bucket and poured a good sample into a pan. The pan held a nice showing of black sand and a fine line of tiny gold pinpoints.

If you go on the other trail, which is longer, you can access a gravel bar directly across the Skykomish from the mouth of the Sultan River. The bedrock isn’t accessible, so you’re limited to float gold trapped in the gravels, or more moss mining.

Skykomish River

GPS reading

47.84517, -121.92648

Land Status

US Forest Service

Activity

Panning, crevicing

Warning(s)

Fishing spot

Waterway

Skykomish River

Nearest town

Monroe


Figure 7. Bedrock along the south shore of the Skykomish River near Monroe.

Because so many mines dot the hills above the Skykomish River, and gold enters in from the Sultan River, Miller River, Foss River, North Fork of the Skykomish, and Money Creek, we gave the big river a chance outside of Monroe. To reach this spot, from Monroe drive south on Lewis Street, which is also WA 203, for a mile until you reach Ben Howard Road. Take Ben Howard for about 2.1 miles until you spot the fisherman’s access point.

This public access spot has a bedrock outcrop at the upper end, and it’s covered with moss. There are gravity traps in the crevices that replenish constantly. The gravel bar itself can be crowded with fishermen during the fall season, but when its less occupied, you can rockhound the gravels for lots of interesting material for the tumbler.

Summary

The Steven Pass area has a lot more mining history than you might think. We sampled from multiple spots in a fascinating three-day tour, then set up a few of our panning machines in camp to figure out which area was best. Hands down, Money Creek was the winner. We ended up with the best colors and the most black sand from Money Creek, but Miller River wasn’t bad. The Sultan is promising, and spots on the Skykomish, such as the Gold Bar area, or our bedrock discovery near Monroe, were decent enough.

The Washington State Department of Natural Resources wants you to have a “Gold and Fish Pamphlet” with you whenever you pan, but the good news is that they finally relented and you can pick it up off their website, rather than get it mailed to you. Without the pamphlet, you can get a ticket, so be sure to follow up with the links below.

Links

Department of Natural Resources

Info on collecting, plus the home of the infamous Washington minerals checklist.

http://wdfw.wa.gov/habitat/goldfish/

Geology Adventures

Bob Jackson leads Washington field trips for newcomers and experts alike, priced accordingly. If you liked Hansen Creek, try Spruce Ridge or Big Rock Candy Mine.

http://geologyadventures.com/

National Forest pages

Crucial for road and fire information; always good to check in before you visit. Links to all Washington and Oregon forest offices.

http://www.fs.fed.us/r6/r6nf.htm

Washington Geology Maps

Those pretty colored maps that show the bedrock geology. Interactive; describes formations.

http://wa_geology.home.comcast.net/

Washington Prospectors Mining Association

Energetic group with tons of gold knowledge. Plus, they own their own claims.

http://www.washingtonprospectors.org/

Washington State Mineral Council

The grand-daddy of all Washington rock clubs.

http://www.mineralcouncil.org/

Bibliography

Johnson, Robert Neil, Gold Diggers Atlas. Cy Johnson & Son, Susanville, California. 1971; 64 pgs.

Koschman, A.H. and Bergendahl, M. H., U.S. Geological Survey Professional Paper 610: Principal Gold-Producing Districts of the United States, 1968. 283 pgs.

Northwest Underground Explorations, Discovering Washington’s Historic Mines, Vol. 1: The West Central Cascade Mountains. Oso Publishing Co., Arlington, WA. 1997. 230 pgs.

**

Garret Romaine is the author of Gem Trails of Washington, Gem Trails of Oregon, and Rockhounding Idaho.

Ghost Towns of Wyoming - Bald Mountain

During my travels to gold prospecting locales across the west, I’m often struck by the cold hard fact that some towns seem born to die out. Promising mines turn stingy at depth, or prices collapse; then the towns dry up and blow away. Often, there’s not much left but a tailings pile and some concrete foundations around the mill.

Sometimes it seems like the vast interior of the country is emptying out, but it’s always been that way. Gold prospectors know the history of the west better than most, as we can almost recite the stories about towns rising and falling with each new rumor. The ghost towns we know about are usually way up in the mountains, at the end of a long, bumpy road, and revolve around a big mine. The trade-off is that the more remote the old ghost town, the more likely that there are still good colors in the creeks and interesting specimens on the tailings piles.

For example, I’ve been spending the winter months researching gold districts in Wyoming. I hope to write my next general rockhounding book on the state, and I’ve been learning a lot as I dig in. One ghost town that came up in my reading was “Bald Mountain City,” which I had a tough time tracking down.

Gold In Wyoming

First, let me give a little background. Wyoming is known for two major gold districts: the Atlantic City/South Pass region, more or less in the upper Sweetwater River drainage, and the Keystone/Douglas Creek area, a reliable producer south of Laramie. The GPAA Claims Guide shows member claims in both districts, and if all you had time for was a trip to haul in some Wyoming gold, those would definitely be your first ventures. With the recent rise in gold, many old claims have been renewed, so it’s comforting to know that your membership provides full, legal access to claims in the two main gold districts in Wyoming.

However, my research takes me in a different direction; I want to know about other mineralized areas where rockhounds can find interesting material. So I’m always looking for locales that might be off the beaten path in order to come up with 150-200 sites in the state to check out. It’s comforting to know that there are additional mineralized areas to explore among all the Wyoming granite.

Using a simple Google search such as “gold in Wyoming,” I located and downloaded W. Dan Hausel’s excellent write-up, named “Searching for Gold in Wyoming.” The booklet is available as an Adobe Acrobat .PDF file and listed as Information Pamphlet #9. In the back, on the gold districts map (see figure 1), I saw a reference to Bald Mountain, located in a northern section of the Big Horn Mountains, north of Greybull. That was where my search started.

Figure 1. Principal mineralized areas and mining districts in Wyoming, from GeoCommunicator. Click on it to make it bigger.

GhostTowns.Com

I checked in another of Hausel’s Wyoming books, and found a reference to Bald Mountain City. When I Googled that, I found a note on http://www.ghosttowns.com. Here’s the report:

“Discoveries of fine-grained gold north of Bald Mountain were made in 1890. ‘Gold Fever’ brought many prospectors to the area over the next 10 years. In 1892, the Fortunatas Mining and Milling Company purchased a group of claims on the head of the Little Big Horn River and Porcupine Creek. The excitement led to the establishment of Bald Mountain City, the most extensive attempt at a settlement in the Big Horn Mountains. The gold rush ended by 1900 because yields were not enough to pay for the effort of panning. No current residents. The city's remains lie just east of the Medicine Wheel National Historic Site in the Big Horn National Forest, just off Highway 14A.
No buildings remain standing, only log foundations, metal scrap, etc. Look for clumps of trees where buildings once stood. SUBMITTED BY: Kevin J. Tupps.”

You might notice that there aren’t any good directions in that write-up. I’ve spent hours in fruitless search trying to find a locale with about the same information. I met a rockhound the other day who searched for an abandoned mine for THREE DAYS and was still upset about the adventure. So I was hoping that Google Earth might show me where the actual city ruins lay.

Here’s a case where Google Earth isn’t that helpful; I typed in “Bald Mountain City, WY” in the Fly To box, and nothing came back. The problem is that Google Earth is completely up to date, and unless a place name stuck, and people still live there, you can’t use their data to search for a ghost town. So I tried a back-door trick with Google Maps, located at http://www.maps.google.com. If you turn on the “terrain” feature, instead of just maps, you sometimes get place names.

Again, no luck. Bald Mountain City just didn’t stick. Instead, I got referred to City Park Drive in Boulder, Colorado. So I worked the old-fashioned way, tracing out US 14 keystroke by keystroke, ranging north and south. I finally located Little Bald Mountain, and then Bald Mountain, right along the road. I figured Bald Mountain City must be on the flanks of Bald Mountain.

GeoCommunicator

So I turned next to my stealthy trick to access topographic maps online: GeoCommunicator. Browse to http://www.geocommunicator.gov and click the link for “Mining Claim Map.” Then you just click your way to happiness. The BLM has performed yet another overhaul of the interface, and you can now drag your way across maps much easier. I use the World Street Map for a base until I pinpoint an area, and then switch to the Topo Map as I zero in. Because I had a good idea of where to look, it didn’t take long to strike electronic pay dirt.

Ranging north from Bald Mountain, I got lucky. I found Porcupine Creek, and it looked like it was open for panning. The next thing I noticed was Gold Creek, slightly east. That was a good start, and then I saw Half Ounce Creek, just to the north. I kept clicking to get the best resolution, and the map finally changed into that familiar topographic map format. And there it was: Bald Mountain City (site). I saw several prospect symbols north of town, a lot of abandoned four-wheel drive (4WD) roads, and sadly, a 20-acre placer claim on Half Ounce Creek. The good news was that the claim didn’t extend all the way to the Little Big Horn River, and Gold Creek was completely open. I snipped a little of the map in Figure 2.

Figure 2. Topo Map from GeoCommunicator shows the location of Bald Mountain City. Note current claim, indicated by rectangular hatched area along Half Ounce Creek. Click on it to make it bigger.

So now, using Google Earth, I tried to pinpoint the “modern” location of Bald Mountain City. I found what I was looking for and clicked the “My Place” push-pin icon, then dragged it to where I wanted it, entered a name, etc. Once in place, I right-clicked on the icon and asked for directions from Lovell, Wyoming, which I figured was near enough. I just wanted to turn off US 14.

From Lovell, drive east on US-14 about 40 miles. Turn north onto Sheep Mountain Road, and drive about 0.6 miles. (Google Earth thinks there is a short-cut here, but I’ve learned over the years that you can’t count on most of them, and if there is a main road, trust it for your mileage reading.) Take a right onto Forest Service Road 125, go about 1.4 miles, then dip down to the right for a tenth of a mile. There should be debris here to mark the old town. The GPS coordinates I’m using (until I can get there and verify them) are: 44.8063502, -107.7892637.

The next step will have to be a personal visit, sampling Porcupine Creek, Gold Creek, Half Ounce Creek, and the Little Big Horn River itself. I’ve never been to the site of Custer’s Last Stand, but I know it was on the Little Big Horn River, so here’s an opportunity to pan for gold on the same body of water. If one of you gets out there before me, please report your find!

Other Wyoming Resources

Wyoming Historical Society

One piece of data that can really aid a search for an old ghost town is the use of historical maps. At the Wyoming Historical Society, I found a page with plenty of old maps: http://wyshs.org/node/35. For example, on an old map for the Fort Bridger area, way stations for the Pony Express jump off the page. The rest of the maps on that page also show forts, corrals, way stations, and other historical information that could come in handy.

Wyoming Tales and Trails

http://www.wyomingtalesandtrails.com

This is a great site for poking around, with 900 photos and well-indexed stories about locales all over the state of Wyoming. The music was a little jarring the first time it kicked in, but I got used to it as I just kept looking around. I unearthed some corroboration for the Ghost Towns.com information on the Meeteetse page:

“Charles L. Tewksbury… was the manager of the Wyoming Mining & Milling Co. Previously, he had been the superintendent of the Fortunatus Mining Company's short lived but expensive efforts at gold mining near Bald Mountain City west of Dayton, Wyoming. In 1895 startling information was revealed as to the discovery of a rich claim at Bald Mountain. Mining machinery was hauled up the steep slopes by ox team from Dayton. In all, Fortunatus poured in about a half million dollars into the effort, all for naught. In late 1896, mining engineer and professor of chemistry and geology at the University of Montana, Fred D. Smith, in the Engineering and Mining Journal exposed the claims as being exaggerated. Although some mining continued near Bald Mountain City as late as 1903 and a revival was tried in 1937, the gold was not commercially viable. Today, Bald Mountain City lies abandoned with nothing to show that it was the site of a gold rush.”

Thunder Mountain Tours

http://www.thundermountaintours.com/tours.htm

If you want to take the family on a guided tour of not only Bald Mountain City but the Hole in the Wall camp used by Butch Cassidy and the Sundance Kid, check out the tours page.

Where to Find Gold

http://www.iowagold.com/WHERE_TO_FIND_GOLD_USA_PAGES/wyoming_gold.htm

This web page has extensive information about most of the gold locales in the western US. Here’s what they say about Bald Mountain City:

“In T54N R87W, the Mosaic Claim produced lode gold. West of Sheridan about 60 miles on U.S. 14 and 14 Alt., on top of the Big Horn Mountains, take the north trending dirt road to the Bald Mountain area in T56N R91W. This is the old site of Bald Mountain City. Sometimes this old city was called "Baldy". It is at an elevation of 9,000 feet on the headwaters of the Little Big Horn River. There were many old mines in the area. North from here toward Montana line, in the disintegrated granite you will find fine grained free milling gold. 1 mile west of Sheridan you will find the old log structures of the old Forunatus Mill. The area around the Mill contains intrusive dikes or chimneys that have minor amounts of gold in them.”

Scenic Driving Wyoming

Here’s an excerpt from the book, which I also found with my Google search:

“The granite rocks in this area contain small amounts of gold-bearing quartz. Prospectors discovered fine-grained gold near here in 1890. Word spread and people flocked to the area, drawn by dreams of wealth. In 1892, the Fortunatas Mining and Milling Company bought some claims north of the highway at the headwaters of the Little Bighorn River and Porcupine Creek. Bald Mountain City, the largest attempt at settlement in the Big Horn Mountains, was founded. The cold, high elevation made life difficult for the miners. Yields were poor for the amount of hard labor required. The boom soon ended because no strikes large enough to be worthwhile were made. After the mining petered out, the town was quickly abandoned and little remains today, other than place names such as Gold Creek and Half Ounce Creek. Bald Mountain Campground, about a half mile down the road from the interpretive pullout, has sites sheltered from the wind by a grove of evergreens. About a mile past the campground is the turnoff on the right for the Medicine Wheel, another worthy side trip…Archaeologists are uncertain about the origins of the Medicine Wheel. Studies indicate that it may have been built sometime between A.D. 1200 and 1700…”

GNIS

http://geonames.usgs.gov

While drifting around looking for more information about Bald Mountain City, I stumbled across the Geographic Names Information System (GNIS). I wish I’d seen it earlier. I clicked on “Search Domestic Names” and brought up a query form. I entered the information for Bald Mountain City and up it came. Not only that, it listed two alternate names: Bald City, and City of Broken Dreams. Over on the right side of the page is box of Mapping Services, including Virtual Earth, MapQuest, Google Maps, TerraFly, and TerraServer DRG, a topographical map server. Best of all, you don’t have to re-key the GPS coordinates, because the system automatically links you. At least I was able to confirm the GPS coordinates I interpreted from earlier on.

Summary

In closing, consider the words of W. Dan Hausel, the expert on Wyoming’s mineral riches that I mentioned earlier. I excerpted some of his advice from Information Circular #9: “The search for productive gold deposits requires a good background in prospecting and economic geology as well as some luck. There are still many placer and lode deposits to be found, although the discovery of entirely new mining districts is rare. In all my years as an exploration geologist, I have only been able to find one new gold district. However, I have found many gold deposits within known districts. Some of the better areas to search for gold are historical mining districts... In my experience, it is rare that any ore deposit has been completely mined out. Many historical and modern mines still contain workable mineral deposits as well as nearby deposits that have been overlooked. Many well-known giant mining companies of the past were notorious for overlooking significant ore deposits. Thus, one could potentially make a living just following up on the exploration projects of many of these past giants [as well as some projects of present giants].”

Garret Romaine is the author of Gem Trails of Washington, Gem Trails of Oregon, and Rockhounding Idaho,

Lake Chelan

One of my favorite things about gold prospecting is the opportunity to visit and explore new places. I have been to areas so far off the beaten track that the hustle and bustle of civilization seemed like a distant memory. Other times, I’m pretty sure I was the only one in the crowd that was thinking about gold panning. That’s what happened last Labor Day when I took a long, 50-mile ferry ride up Lake Chelan, Washington to the Stehekin River.

To set up the trip, I relied on Internet links to the local chamber of commerce, to various services companies, and for historic information. It went pretty smoothly, too, and there was still enough of a spirit of discovery to stop at local wineries, fruit stands, and viewpoints to keep my partner interested.


Figure 1. Map showing the route through several northern Washington gold districts.

One good link to use when planning a trip to Washington is www.experiencewa.com. You can use the links on this page to to run down activities, lodging, dining, and other tourism-related topics. If you know the state, you probably don’t need this much information, but if you’re new to the Pacific Northwest, these folks can help. Their Travel Planner “catalog” is thick and impressive.

History

The name Stehekin is taken from the Skagit Indian word, which means “the way through.” Crossing the North Cascades proved a challenge for Indians and trappers alike, but it was possible to track up Lake Chelan, follow the Stehekin to its source basin, and drop back over to the western side of the Cascades.

Once mineralization was discovered at the headwaters of the Stehekin River, there were immense challenges in getting any ore to the smelter at Tacoma. According to the Northwest Underground Explorers, “The majority of the Stehekin mining area is underlain by pre-Upper Jurassic gneisses, many migmatic in nature. To the northeast of the Stehekin River lies an exposed, narrow band of pre-Upper Jurassic metamorphic rocks, running from southeast to northwest. The headwaters of Bridge Creek rise in Tertiary-Cretaceous, intrusive, igneous, granitic rock that contacts the gneisses along a broad zone in the region of the McGregor Mountain ridge. The mineral bearing zones were found throughout the gneisses and along the contacts between dissimilar rocks. The area is not heavily mineralized, and with few exceptions, mining never really gained a foothold there. Several of the properties assay highest in gold or silver, but by far the majority assay highest in lead.” (vol. 2, p. 35)

At the Skagit River journal site, found at http://www.skagitriverjournal.com/Portal/MiningSec.html you can get an overview of the history of North Cascades mining, and in particular the Skagit district, which was the first big rush to the area. “Jack and George Rouse [actually Jack C. Rouse and George L. Rowse] were among the first prospectors in the district and located the Boston mine. The district also had its lost mine like other places. A company of solders came over the pass in the early days and one of them found some rock that reportedly showed much gold. It was later searched for and the Soldier Boy claim was located on what was thought to be the place the gold-bearing rock came from. The only ore I took [from] there showed only iron pyrite. . . .”

Although the Rouse was happy mining in Washington, he, too, felt the call of the Yukon:

“…George decided to follow gold seekers to the Klondike river region of southeast Alaska in 1898. He initially staked a claim on Seventy-mile creek and then in the fall, he returned to Dawson to work in a claim on Bonanza Creek. But in 1899 he went first to Nome and then returned to Seattle via Dutch Harbor, deciding that Washington mines were more promising. He missed the Nome gold rush by a year. From then on, according to the 1904 book, he invested ‘his entire time and energy to the development of the properties above mentioned’ at the Boston Mine.”

According to Roy Mayo, in his book Washington State Gold Mines, “Placer gold has been found on beaches in several places on Lake Chelan. Many creeks along the upper part of the lake will produce some gold. Railroad Creek has had several good placers. The Stehekin River has produced placer gold for several miles above it’s mouth.” (p. 58) It was Mayo’s information that first spurred me to explore the upper area of Lake Chelan.

Getting there

The route we took was circuitous, to say the least. We drove up I-5 to Sedro-Woolley and turned east on WA 20, going through Concrete and Marblemount to reach Ross Lake National Recreation Area and the North Cascades National Park. Here’s a link for the North Cascades park complex: http://www.nps.gov/noca. The first night, we camped at Goodell Campground. You can find a map of the site at http://www.nps.gov/noca/planyourvisit/upload/Goodell.pdf. This campground has great access to the river, but it’s close to the highway, and a better choice would probably have been Newhalem, only another mile up the road. Here’s the map: http://www.nps.gov/noca/planyourvisit/upload/newhalem%20loops.pdf.

In fact, the campgrounds are so close together that a National Park Service ranger came through in the morning and invited us over to Newhalem for coffee and cobbler. I poked my nose into the gift shop to see if any of my rockhounding books were on sale there (they weren’t) and picked up an annual parking pass.

For day 2, I did some exploring for an upcoming book on gold prospecting in the Pacific Northwest. There’s no contract and no schedule, so mostly it was a great excuse to check out a couple of spots in Washington’s obscure North Cascades area. Plus, it’s a very scenic route. First, we checked around the Ruby Arm of Ross Lake. We parked at the Canyon Creek trail head, then hiked past the cabin and sampled a few spots up Canyon Creek. Thanks to my membership in the Washington Prospectors Mining Association, I was there by permission. You can check them out at http://www.washingtonprospectors.org.

Figure 2. Scenic Diablo Lake, part of the North Cascades National Park.

This low on Canyon Creek, I didn’t find much coarse gold. There was good black sand, plenty of moss on most of the boulders, and nice exposures of bedrock right in the water. The concentrates also contain beautiful, if small, purple-red garnets. Even this late in the summer, the water was numbingly cold.

After that we drove over Washington Pass and stopped at the scenic viewpoint. The Golden Horn Batholith juts out here, and rockhounds have pecked at the edges of the granite pluton for years, searching for quartz crystals and other specimens. Lanny Ream’s book Gems and Minerals of Washington is a great source of information if you’re interested.

We continued on to Mazama, turned north by northwest, and set our sights on Hart’s Pass. The road is steep and narrow in places, and definitely gets your attention, but the views of the Methow River valley are amazing. I thought the slate outcrops were pretty nice, too. We reached the pass and turned off to the southwest to access Slate Creek. This area is claimed up pretty well, but again I was there by permission, and I did very well. In just under an hour of panning and picking at crevices, I was able to recover some coarse flakes very quickly. I found a spot right on bedrock, with moss, crevices, crooks and crannies, and I came away very impressed. I would definitely go back to Slate Creek.

Figure 3. Methow Valley, from the road to Hart's Pass.

From there we backtracked to Mazama and continued east on WA 20 to Winthrop, a very fun little town that was really hopping for the Labor Day weekend. We skipped several more gold districts on the Twisp River and on the Methow River so that we could get to a motel in Pateros. Just a warning: just about every motel and resort in Chelan wanted a three-night minimum for the Labor Day weekend, and most were completely full.

The third day, we got up early and drove to the ferry by 8:30 a.m., then settled in for a long boat ride up Lake Chelan. You’ll find complete schedule and passenger information at http://www.ladyofthelake.com. We opted for a combo of fast ride up, three-hour layover, and then a slow ride back. It was a warm day, and it felt very relaxing to nod off and feel the heavy sound of the straining diesel engines.

Figure 4. The only way to get to the mouth of the Stehekin River is by float plane or ferry.

One side note – the boat does stop at Railroad Creek, which is a known gold producer. I opted to skip that prospect, but it’s there for another time. Most of the old guides and atlases mention Railroad Creek and the Holden Mine, so if anyone ever checks it out, I’d sure like to hear about it.

Once at Stehekin, we quickly rented bicycles at Discovery Rentals. These folks were fantastic, getting us on the road in no time. Here’s their website: http://stehekindiscoverybikes.com. Next, we headed north on nice 18-speed mountain bikes. We stopped for a box lunch at the bakery, officially called The Stehekin Pastry Company (http://www.stehekinpastry.com). Their sandwiches are hearty and their service is fast. In no time we were headed up river. About four miles from the boat, around the Company Creek Campground, we were finally out of most of the private land. At about five miles up, there was a nice big bend in the river, with plenty of exposed gravel. If you go too far north, at about 10 miles from the boat dock, you’re into National Park land. As most of us know, there’s no panning in any national park or national monument. So we got above the private land and stayed below the park service boundary. I found a fairly decent spot near the bridge to the campground, too, and since the water was low, I could work in and around some big boulders.

Note that this is one of those perfect opportunities for a fold-up sluice. I had recently purchased the Jobe fold-up sluice, which you can see at http://www.jobewholesale.com/jobe-folding-sluice.htm. I bought mine at Blue Bucket Mining Supplies in Bend, Oregon. Their link is http://www.bluebucketmining.com. My contact there is Tina Vickers, who maintains an active Facebook presence.

I have to confess, that water is COLD! It was hard to stay in for very long. I made some pretty good concentrates, panned occasionally to see how I was doing, and was rewarded with lots of black sand and many very small colors. I can officially report that there is decent color in the Stehekin, and I added my concentrates to the “collection.”

On the way back down from the river, we stopped at Rainbow Falls and checked that off the list – it’s beautiful. The trip back on the lake was relaxing, and I got in a good nap. We reached the dock at a decent time and drove south to Entiat, then up the Entiat River to the Pine Flats campground on the Mad River. The link to check it out is at http://www.us-parks.com/camping/wa/pine-flats-campground.html. There was plenty of room, and we enjoyed a good bonfire that night.

The final day, I got up and sampled the Mad River at several places. The campground had a great access point, but with several big mossy boulders to scratch at. Lower down, below Pine Flats, I found some excellent bedrock exposures where the cracks were lined up perfectly to act as riffles. I sampled them quickly, and found excellent black sand and some decent colors. Next, I sampled some claims on Indian Creek, and the concentrates there were not as promising as I would have liked. But to make up for it, I found several small, gray flakes that are probably platinum.

On the way down, we detoured up Crum Canyon, but there is very little water in this area by late summer. Also, there was lots of private land to negotiate. I ran out of time to check the abandoned mine there.

Figure 5. Overview map of North Cascades in Washington, from Gold Diggers Atlas. Click to make it bigger and more clear.

We came home via Blewett Pass, Liberty, Swauk Creek, and Peshastin. I’ve checked many of the creeks up there in the past, and written up the area for these pages. If you’ve never visited Liberty, or tried your hand in the open recreational area along the Swauk, you’re in for a treat.

Summary

This area is fun to explore in late summer. The temperatures still get hot during the day, but you’ll cool off by night-time. There are many, many old districts to explore, and it’s hard to pick one as “best.” I’ve explored up here several times, but I still have a lot of work to do. But that’s the fun part about this hobby, right?

Additional readings

Mayo, Roy F., Washington State Gold Mines, Nugget Enterprises, Enumclaw, WA. 1983. 80 pgs.

Johnson, Robert Neil, Gold Diggers Atlas, Cy Johnson & Son, Susanville, WA. 1971. 64 pgs.

Koschmann, A. H., and Bergendahl, M. H., Principal Gold-Producting Districts of the United States. U.S. Geological Survey Professional Paper 610. 1968. 283 pgs.

Northwest Underground Explorations, Discovering Washington’s Historic Mines, Volume 2: The East Central Cascade Mountains and the Wenatchee Mountains. Oso Publishing Co., Hamilton, MT. 2002. 336 pgs.

Northwest Underground Explorations, Discovering Washington’s Historic Mines, Volume 3: The Northern Cascade Mountains. Oso Publishing Co., Hamilton, MT. 2006. 315 pgs.

Ream, Lanny, Gems and Minerals of Washington, 3rd Ed., Jackson Mountain Press, Renton, WA. 1994. 217 pgs.

Smith, Jerry, Boom Towns and Relic Hunters of Northeastern Washington. Elfin Cove Press, Bellevue, WA. 124 pgs.

Garret Romaine writes from Portland, Oregon. You can find him online through his Facebook page.

Product Report: Gotcha Water Table and Magna-Two Magnetite Remover

As long as I can remember, I’ve been curious about the gold content of Oregon’s beach sands. I’ve collected concentrates by the bucket, and tried to work them down with my existing tools, but it’s always been something of a fool’s errand. There is so much magnetite that the material is very difficult to pan. What little gold there is can make the head of a pin look like a football field. And there really isn’t that much gold to begin with.

Now, I’m happy to report, I finally found a pair of tools that work on every type of sample possible, including extremely fine beach sands. Reader and inventor Bill Martsolf contacted me recently and asked if I would be interested in trying out the Gotcha Water Table and the Magna-Two magnetite remover. I had collected many concentrate samples over the last couple of years, so I agreed, and he sent them to me right away.

Magna-Two Magnetite Remover

First, I checked out the Magna-Two, which works on dry material. I dumped a few pounds of beach sands into my largest plastic pans, let them dry for a week, and then ran them through my fingers. The material was dark, heavy, and powdery.

Whenever I’ve used magnets to clean sand, I’ve always been nervous about pulling out gold. Indeed, about every time I’ve panned the magnetic sand removed by a magnet, I’ve found pinpricks of gold in there. Maybe you’ve tried it and found the same thing – you grab your big magnet, drag it through the concentrates, and create this big, long, black beard. You just know it’s robbing you.

The Magna-Two solves for that by adding vibration to its magnetic system. You can see from Figure 1 that the contraption is simple. It works on gravity and electricity, and is easy to operate. Turn on the power source, made of eight 1.5V batteries, and the action begins. Powerful magnets reach through the sheet aluminum, while the motor rattles the tray vigorously, vibrating away any non-magnetic material.

Figure 1. Magna-Two magnetite remover, sitting in a shallow plastic tub (not included).

When I worked with my beach sand sample, several big, dark magnetite “blobs” or “islands” soon appeared, as black magnetite was pulled to the magnet, while the pay dirt poured off the end into a tub or tray. From Figure 2, you can see that the magnetite starts to grow spikes and tendrils when it’s ready to dump. Once you have built up a lot magnetite, you stick a small pan or plastic tray under the ramp, lift it from the magnets, and the magnetite runs off.


Figure 2. Small magnetite "islands" starting to build.

It doesn’t take long to figure out how to sprinkle your concentrates lightly so that the magnets can work most efficiently.

I ran my beach sand material through the Magna-Two several times and got it as clean as I could. Finally, it was time for the Gotcha Water Table.

Gotcha Water Table

The water table works on gravity, with a water pump in a large tub that re-circulates constantly. Once you get it set up, following the easy instructions, you add a few drops of Jet-Dry automatic dishwasher conditioner, which serves to reduce the surface tension of the water. This makes sure that your finest gold doesn’t float away.

A very thin sheet of water flows across the green table surface, fast enough to carry away light material, but not so boisterous as to move the heavier gold. There are no riffles – the surface rough enough with its painted surface, full of micro pits and bumps. Bill painted the surface with the familiar green chalkboard paint, which gives the surface a little roughness, and improves your ability to see even the tiniest gold colors. Refer to Figure 3.

Figure 3. Gotcha Water Flow Table.

After so many years in the field, I had collected quite a shelf of concentrates from all my travels. In additional to my big bottles of beach sand, I had saved material from Oregon, Washington, and Idaho, some marked, some that only I knew, and a few “mystery” jars that I could only guess about. Some of the bottles in Figure 4 were themselves collections from a weekend trip or from an entire summer. It was time to throw caution to the wind and start working them down.


Figure 4. Full sample jars from various outings.

All of these samples were still wet, but they were quite small, and I didn’t think they’d choke the Water Table if I was careful. I was right. By just sprinkling material onto the top of the table, I could control how fast the system worked. The water flow pushed slowly but surely against the concentrates, and the lighter material flowed quickly downwards.

Sure enough, I could tell almost instantly if there was significant gold present. I had watched Bill’s YouTube video about the process, located at http://www.youtube.com/user/nuggetbill#p/a/u/1/16REqjjWGKw, and it helped a lot. (I know that’s a long URL; you can just search on “nuggetbill” and pull up his four videos.) I found that it wasn’t that hard to figure out how to use the included paintbrush to move material around, and because it’s a closed system, you can’t really lose anything.

By treating the side closest to me as “the gold zone” and moving material toward it carefully, I soon began to accumulate a small pile of gold from my first sample. There were some bigger flakes, and I started to wonder where this bottle was from. Then I realized it was a ringer – I’d picked up a sack of Tom & Perry’s gold concentrates at a recent gold show, and cleaned it using my Gold Magic panning machine. No wonder it was so rich. See Figure 5.


Figure 5. Carefully brush the clean gold to one side for easy pickup.

Still, using a sample with gold in it really helped me learn the system. I slurped all the gold into a small snuffer bottle, which I tested to make sure had no gouges or scratches. Otherwise, you’d have to sand the snuffer end smooth. The green surface is really sensitive, and you can easily scratch it if you have big rocks or a rough snuffer bottle tube. I put a scratch in mine just unpacking it.

As I kept cleaning up small sample jars, old snuffer bottles, and other odds and ends, I got the hang of the action really fast. The paint brush revealed buried gold with a small flick, and the water pushed the waste material away with brutal efficiency.

Some of my samples were devoid of gold, and some had just one or two tiny pieces of flour gold. The water table was cleaning everything up quickly, and it was fun to go through bottles that I’d been saving for just such a day.

Soon, I felt confident enough to try the beach sands I’d collected the last time I was at the coast. The entire process was as follows:

1. Collect material and put into pop bottles

2. Dry the material in a big gold pan

3. Remove the magnetite with the Magna Two unit

4. Run the concentrates through the spiral pan

5. Run the remaining concentrates through the Gotcha Water Table

I cleaned five pounds of black beach sands down to a half-cup of what I hoped was pretty good stuff. I started slowly sprinkling it out, and sure enough, I began to see small pinpoints of gold in the material. There wasn’t much, and it was all very small, but I could see them. I began slurping them up with a snuffer bottle, and saw that I was getting a really clean sample. At last, I had found a way to liberate gold from beach sands without using mercury, nitric acid, or any other environmentally questionable method.

Here’s the result of all my labors for the afternoon in Figure 6:

Figure 6. Clean gold extracted in a single afternoon from multiple samples.

Some of my ideas would probably run the cost up, and Bill is trying to keep the unit affordable. According to the ad at http://gpex.ca/ads/gotcha.html the unit costs just $215, plus shipping, which is a bargain as far as I can tell. There is a very nice discussion there, where experts argue the advantages of blue bowls, spiral pans, water tables, and plain old-fashioned panning.

There is also a discussion about the Magna-Two: http://gpex.ca/smf/index.php?topic=2685.0;wap2. The cost for the Magna-Two is $142 plus shipping. If you want more information, Bill’s email address is martsolf22@msn.com.

Summary

Back in the earliest days of the GPAA television shows, founder George Massie used to tell a story about cleaning up his concentrates in an outside shack, where it was cold and drafty. He didn’t mind too much, he said, and he’d take his time, cleaning up buckets of gold-rich black sand with all kinds of contraptions. Still, he admitted, it would be better to be able to do his cleanup inside the warmth of his own house.

If I remember the story right, when he found a big bonanza hole on the Stanislaus River, and recovered about 800 ounces of gold in one summer, he was finally allowed to do his clean-up in the front room. Which just goes to show – if you find enough good material, a lot of your problems will be solved.

Garret Romaine has been writing for GPAA since 1996. He is the author of Gem Trails of Oregon, Gem Trails of Washington, and Rockhounding Idaho.

Meteorites, Magnets, and Metal Detecting

I’ve probably been watching too much “Meteorite Men” on the Science Channel. I’m starting to see little rusty rocks everywhere I go, and since I visit a lot of gravel bars in the course of rockhounding and gold prospecting, I’m getting nervous that I’ve passed over a valuable piece of space debris. If you haven’t caught meteorite fever yet, try this website: http://meteoritemen.com and check out the stories there. You can even purchase a space rock of your own, such as the Gibeon fragment from Namibia worth about $3,300, shown in Figure 1.

Figure 1. (Left) The Gibeon meteorite, from Namibia, weighs about 3,600 grams and is for sale at www.aerolite.org for $3,300.

In one of the latest episodes, the two meteorite hunters traveled to the Atacama Desert in Chile to visit a known “strewn field” where they had found fragments in the past. Many times, they use metal detectors for their work, including one time when they rigged up a giant ten-foot array detector that they towed behind them in a Kansas wheat field. They found a huge space rock about six feet beneath the soil thanks to that contraption.

This time, they rigged up a drag board fitted with dozens of powerful rare-earth magnets, and hooked it to their pickup truck. They repeatedly raked the red desert floor and managed to attract dozens of little pieces of iron, worth between $5 and $10 per gram. They also devised another big array detector and found a larger piece, worth almost $20,000.

We all know there are about 31 grams in a troy ounce, and with gold at about $1300 per ounce, that works out to around $40 per gram. Some of the very rare pallasite meteors are worth about the same amount.

Obviously, a metal detector that can search for gold and iron would be a nice purchase. More on that in a minute. My low-tech solution was to purchase a used golf putter at the local Goodwill store, and pick up a fancy round magnet at one of the many online sources, such as http://www.magnet4less.com.

Before going further, here’s something you should know – these neodymium-based magnets are much more powerful than you’re used to. At www.UnitedNuclear.com, they provide this warning:

“Neodymium magnets are very powerful, much more powerful than magnets most people are familiar with and need to be handled with proper care. The magnetic fields from these magnets can affect each other from more than 12 inches away. Please note that these magnets are fragile. Even though they are coated with a tough protective nickel plating, do not allow them to snap together with their full force or they may chip, break, and possibly send small pieces of metal flying on impact. Our magnets can easily bruise fingers and the larger ones can break finger bones and even crush hands as they attempt to connect together.”

I can attest to that, but the way. I had two rectangular neodymium magnets about two inches long, an inch wide, and a half-inch thick. They looked like fat dominoes. Or, one still does. When I was dinking around with them, they flew together with a loud “clap” and one of them busted into halves, with additional fragments flying around. One went whizzing past my ear like an angry hornet, and another carved a deep scratch in my finger, drawing blood. On that same Atacama desert episode of “Meteorite Men,” prospector Steve Arnold got his fingers pinched between two magnets and he, too, donated blood.

My New Magnet

So, here’s what I put together, as shown in the figures below:

Figure 2. (Left) Giant neodymium-based ring magnet. You can see it’s been dragged through the dust already, and has picked up some magnetite, black sand, or iron.

Figure 3. (Right) Used golf putter with various magnets attached to the head of the club, and the big ringed magnet sitting on top. Total cost was about $40.


Figure 4. Trash, black sands, and hot rocks picked up around the campfire. Nickel is for scale – magnets don’t pick up most coins.


Famed comedian W.C. Fields once observed there were two ways to travel: first-class, and with children. I sometimes feel the same way about camping. Kids are great fun, and opening up a world of science and discovery is a treat. But the way they run around without any shoes, risking a rusty nail and subsequent tetanus shot, is enough to drive me crazy. I’ve decided I can justify dragging my putter magnet around the campfire a few times because I’m sure to clean up a lot of rusty nails and other trash. I’m a one-man camp cleaner. You can see one of my hauls in Figure 4. In the more popular US Forest Service campgrounds, I’ve run a quick pass over the gravels where I park, and I’ve picked up quite a few nails from perilously close to my tires.

Here are some more links and some background information about neodymium magnets, found at www.kjmagnetics.com.

Rare Earth

“Neodymium magnets are a member of the Rare Earth magnet family and are the most powerful permanent magnets in the world. They are also referred to as NdFeB magnets, or NIB, because they are composed mainly of Neodymium (Nd), Iron (Fe) and Boron (B). They are a relatively new invention and have only recently become affordable for everyday use.

Grades of Neodymium

N35, N38, N42, N38SH...what does it all mean? Neodymium magnets are all graded by the material they are made of. As a very general rule, the higher the grade (the number following the 'N'), the stronger the magnet. The highest grade of neodymium magnet currently available is N52. Any letter following the grade refers to the temperature rating of the magnet. If there are no letters following the grade, then the magnet is standard temperature neodymium.

Platings/Coatings

Neodymium magnets are a composition of mostly Neodymium, Iron and Boron. If left exposed to the elements, the iron in the magnet will rust. To protect the magnet from corrosion and to strengthen the brittle magnet material, it is usually preferable for the magnet to be coated. There are a variety of options for coatings, but nickel is the most common and usually preferred. Our nickel plated magnets are actually triple plated with layers of nickel, copper, and nickel again. This triple coating makes our magnets much more durable than the more common single nickel plated magnets. Some other options for coating are zinc, tin, copper, epoxy, silver and gold. Our gold plated magnets are actually quadruple plated with nickel, copper, nickel and a top coating of gold.

Demagnetization

Rare Earth magnets have a high resistance to demagnetization, unlike most other types of magnets. They will not lose their magnetization around other magnets or if dropped. They will however, begin to lose strength if they are heated above their maximum operating temperature, which is 176°F (80°C) for standard N grades. They will completely lose their magnetization if heated above their Curie temperature, which is 590°F (310°C) for standard N grades. Some of our magnets are of high temperature material, which can withstand higher temperatures without losing strength.”

Neodymium Magnet Information

More background information about neodymium magnets: http://www.kjmagnetics.com/neomaginfo.asp.


Neodymium Glossary

More than you ever thought you could learn about magnetism and magnets. Here’s a full glossary with more details about magnets: http://www.kjmagnetics.com/glossary.asp

Picking a Metal Detector

Magnets are cheap and easy, but I’m planning to replace my old Minelab metal detector in the coming year. I’ve been haunting the websites of two manufacturers: White’s at http://whiteselectronics.com and Fisher at http://www.fisherlab.com.

Getting back to the Meteorite Men, they had this to say on their website about their metal detector:

“If you've watched the award-winning series Meteorite Men on Science Channel, Discovery, Quest, or one of our other networks, then you've seen Geoff and Steve using the remarkable new Fisher F75. This extraordinary, top-of-the line detector is lightweight, perfectly balanced, extremely sensitive and the Meteorite Men's hand-held detector of choice. And it's a meteorite-finding machine.

The Meteorite Men used their F75s with great success at Canada's amazing Whitecourt Crater, at Gold Basin in Arizona, at the famous Odessa, Texas meteorite crater, on the search for the legendary Tucson Ring, and at many other secret locations. If you want to up the odds of finding your own space rock, then you need to be using the best equipment out there, and that's the F75.

The Meteorite Men are delighted to offer the very same unit that they've worked with throughout Season One and Season Two. Purchase directly from us and you will receive an exclusive color photo of Steve and Geoff, along with a genuine Sikhote-Alin iron meteorite (witnessed fall, Russia, 1947), so you'll know exactly what a meteorite sounds like when your detector goes over it.”

Cost is about $1,249. That’s a little steep for most of us to justify to our Chief Budget Officer, so they advertise a “starter” GoldBug for about $550.

The White’s GMT costs about $800. I logged onto their site and got this report:

“The White's GMT is a good choice for a low-end gold detector. By using the term ‘low-end’ I don't mean cheap quality, just low price. The GMT can be purchased for about $800.00 new and $500.00 used. It does have some problems with Arizona's heavily mineralized areas but can handle them decently with effort and practice. It can find gold as small as .02 gram with my experience and of course larger pieces. The fact that the GMT is a VLF or very low frequency detector means it can discriminate iron trash very well. In fact from my experience I'd say the discrimination is 99.9% accurate on trash. The digital scale normally shows gold at 25 or lower. What I am referring to is the digital ‘scale’ called ‘Probability of Iron’….

“The real upside to this unit is if you hunt old mine dumps or tailings piles. This is where the true dual purpose of this gold detector comes into play. While the more expensive pulse induction (PI) gold detectors will outshine the GMT or any VLF for the most part in the washes and hillsides, they won't be able to match the GMT's performance in mine dumps and tailings. Not only will the GMT find more gold in old mine tailings and mine dumps it will also tell you when a target is just an old nail or piece of iron junk accurately. It is also not affected by power lines like the more expensive PI units. It is also much lighter in weight than the more expensive PI units if that is a concern for you.

“So if you are looking for an entry level gold metal detecting gold prospecting machine that will do ok hunting washes and hillsides for gold and will absolutely shine in old mine dumps and tailings the GMT might just be the ticket.” (http://whiteselectronics.com/gmt.html)

Fisher F75 Special Edition

Alaska Mining and Diving Supply is a great spot for deals, background information, well-written stories, and more. As of this writing, they had a sale going on F75 units.

http://www.akmining.com/mine/fisher_f75_metal_detector.htm

Fisher Gold Bug 2 - About $800

As stated above, this is a solid detector that works for meteorites, gold, and coins.

http://www.kellycodetectors.com/fisher/fishergold-goldbug2.htm

http://www.akmining.com/mine/fisher05.htm

Coin hunting

I ran across a nice website recently devoted to coin hunting with a metal detector.

Figure 5. This 1875 Swiss half-franc silver coin popped up in southern Illinois recently. How it got there is a mystery… Check www.coinhunting.net for more info about recent finds.

More Meteorite Links

http://www.meteoritesusa.com/meteorite-articles/wisconsin-meteorite-strewnfield-map/

Great information, and tons of links to keep you researching for days.

http://meteorites.wustl.edu/numbers_by_state.htm

Good map and graph of known discoveries in the U.S.

http://www.lpi.usra.edu/meteor/metbull.php

A solid database of discoveries.

http://www.delostooleauthor.com/meteorite_fall.html

Delos Toole’s map of Arizona discoveries.

http://www.meteoritemarket.com/

Claimed to be the oldest and best place to buy meteorites. Also has a key to determine if what you have is really a space rock: http://www.meteoritemarket.com/metid1.htm.

http://epswww.unm.edu/meteoritemuseum/index.htm

University of New Mexico meteorite museum.

http://news.discovery.com/space/meteorite-impact-crater-google.html

Recent meteor crater found with Google Earth.

http://bbs.keyhole.com/ubb/ubbthreads.php?ubb=showflat&Number=279959&site_id=1#import

Google Earth add-on showing 26,000 worldwide meteor impacts; in .kmz format.

http://www.wired.com/wiredscience/2010/08/crater-hunting/

Physicist Amelia Sparavigna of Politecnico di Torino in Italy found a 6-mile-wide crater in the Bayuda desert in Sudan using Google Maps, a free astronomical image-processing program she helped develop called AstroFracTool, and open source image-processing tool GIMP. The work appeared on ArXiv Aug. 3.

Summary

No matter what tool you’re using out there, practice and experience is a big key. Good luck!

Garret Romaine writes from Portland, Oregon.

Wednesday, November 17, 2010

New video - Washington State Jade Rendezvous

In this episode, I traveled to Darrington, Washington for the first-ever Washington State Jade Rendezvous. I had documented the Oso area, among others, as a prime jade locale in my "Gem Trails of Washington" book, but this was even better. We hooked up with several local experts, and you'll see about a ton of nice material collected from the area. In addition, I met up with Ed Lehman, famed wagon-master for the Washington State Mineral Council, and also interviewed Lanny Ream, author of "Gem Minerals of Washington" and one of the premier field geologists in the Pacific Northwest.

http://www.youtube.com/profile?user=DustyFingers5#p/a/u/0/Rr8b_GJ2LJo

Zeolites in Washington video

Check me out in a pith helmet! In this video, we banged on the walls at Robertson Pit outside Shelton and also the "Lucky Strike" pit near the Kamilche casino. After that I visited Rudy Tschernich at the Rice Museum in Hillsboro, Oregon, and viewed his world-class zeolite collection.

http://www.youtube.com/profile?user=DustyFingers5#p/a/u/1/5OqQqLj-WYg