Any experienced gold prospector will tell you that the most important tool among all your gold mining equipment is the humble gold pan. Whether you are testing a creek, digging a crevice, or cleaning up concentrates, there is no better companion.
But, like candy, it’s hard to stop after just one pan. I like to bring a stack of four or five pans with me when I go out, just in case. I’ll bring a bigger pan for rough work, and some smaller pans to finish concentrates. The truth is that there are a lot of different pans out there, and they all have their strengths and weaknesses. In this article, we’ll look at a wide variety of pans, and give you the information you need to smartly build a nice collection of your own.
Old Reliable
First, every gold panner needs a metal pan. The pan in Figure 1 has been with me for 30 years, and it’s still in good shape. I mostly use it as a safety pan, because it’s not so prone to floating away, but I’ve used it for a variety of camp duties as well. It has put in time serving as a giant ashtray and also to light charcoal. Metal pans can act as a large trowel to scoop dirt, clear holes, and dig ditches, although you’ll probably have to bend it back into shape afterwards. An old timer once told me he once used his pan to boil water and fry eggs when he found himself without his usual pots and pans.
Figure 1. "Old Reliable" 11-inch metal pan.
The truth is, I don’t use the metal pan very often to just plain pan. It makes a beautiful noise when it has ball-bearings, fishing weights, or other metal sliding across the bottom, and I’m sure if I got into some good gold nuggets they’d sound nice, too. But the lack of riffles is a non-starter for me. Some newer metal pans have riffles, although they’re more like bumps. Even with that, metal pans are heavy. The bottom line: the build-up of rust and dents just can’t compete with high-tech, purposefully engineered riffles, so let’s move on.
Big Pans
Next, let’s talk about the big boys – the 16-inch battleships that can handle a heaping shovelful of dirt at a time. I’ve got two to show you, with big differences between them.
First is a very standard black model, with a short, 7-inch bottom. It sports three decent riffles, each with a moderate “bite” to work down black sands. However, I would prefer more riffles, and the bottom has always felt too small to me. It’s a good pan for working unscreened material, because large rocks roll right out. It’s best feature is it’s size, because it holds so much material. If you’re on a good crevice and you just want to collect as much as you can before returning to your panning spot, this is a good transport vehicle, although a bucket would work just as well.
Figure 2. Big 16-inch black pan with small bottom.
I’ve always liked my big 16-inch blue pan. It’s lightweight for it’s size, and the bottom is nearly 9 inches across. That allows for a nice fanning action as you spread the final concentrates. The blue color is excellent for revealing gold and garnets, which is a big advantage over black pans that can have issues when playing with a lot of black sand. This particular pan has some real engineering going on with the riffles, which start out very aggressive, sporting a clever, sunken trap area. The second riffle also has serious bite, but the third and fourth riffles are not nearly as intense. They do have a sharp angle, so gold will trap against them while black sand is washing over the edge. All in all, the riffles are excellent. It’s hard to pan with one hand, but when you get the material going, you can feel those riffles biting, which gives you the confidence to get aggressive and really work it. Figure 3. Big 16-inch blue pan.
The trap area also makes using a snuffer bottle easier.
Figure 4. Close-up of riffles and trap area.
The GPAA Classic
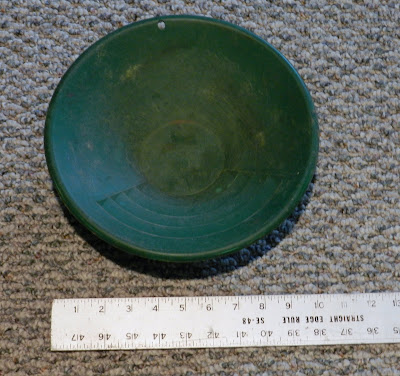
The 14-inch green GPAA pan included in your membership packet is one of my favorites – I have five of them, at last count. It’s the standard Garrett gravity trap style, and it’s been around for a long, long time. The 14-inch size is easier to use with one hand, but it still holds plenty of material. There are four riffles, each with a sharp, aggressive bite, allowing for respectable work with heavy black sands. I frequently stop using the riffles when I get down to a couple tablespoons of material, and rotate over to the smooth side. Or, I’ll transfer the whole load to a finishing pan and start a new batch.
The bottom is wide, at almost eight inches, which gives you a good view of your material when you look for that flash in the pan.
You’ll see some interesting variations on this simple design. The number of riffles can go up to six, which I always appreciate in areas with heavy black sands.
Figure 5. Classic 14-inch green GPAA pan.
Bright Ideas
In an effort to help with black sands, inventors have gone to great lengths to devise better riffles and traps. The pan in Figure 6 is very effective with heavy black sands, as the riffle system contains three small “pre-riffles” that are set at very aggressive angles. They’re followed by four standard riffles, and the last riffle is actually rounded, under the theory that anything interesting should have been trapped down below.
Figure 6. Variation on the classic gravity trap pan.
I found that the over-sized trap is a nuisance, however, especially with a snuffer bottle. Too much material collected in there when I didn’t want it to, and I never really got comfortable with the small micro-sluice leading out of the trap.
Here’s another “gimmick” pan. It’s made out of a different plastic that feels brittle and prone to breaking. The arrow trap isn’t bad – it does work – but with only two riffles, it’s hard to get good work done.
Figure 7. 12-inch black pan with "arrow" trap.
12-inch Pans – Not Just For Kids
I find that when I pan for great lengths of time, I eventually start switching to smaller pans just to save my arm. The 12-inch pan comes in handy when you’re getting worn out, but it’s also great for kids, grandparents, and moms, because it’s easier to handle. There are usually only three riffles, and the bottom is around six inches in diameter. That’s enough to pan concentrates in a tub, or to work material in a creek. You can’t process as much volume as you would with a bigger pan, but you might be able to work longer, and not fall asleep five minutes after dinner.
Figure 8. Standard 12-inch black pan with three riffles.
My new favorite 12-inch pan is a blue, six-riffle design from Keene with an almost eight-inch bottom. The riffles are sharp and trap gold easily, giving you confidence that you can work fast. Then, when you get material down far enough, there are 20 micro-riffles that really let you work through black sands. Large gold pieces show up immediately here, and it’s a nice feature. I just picked up this pan at the 2011 Gold Prospectors Show at Salem, Oregon, and I’m completely hooked.
Figure 9. 12-inch blue pan from Keene has two sets of riffles.
Figure 10. Micro-riffles on the left, and regular riffles on the right.
Finishing Pans
When you’ve got material that is screened, sorted, and concentrated, you don’t need the big pans any more – you need a smaller pan for maximum control. I used to use a small, green 10-inch pan with four riffles and a three-inch bottom for finishing work. It had a nice feel, and I was comfortable with it. For example, by using a panning tub and a safety pan, I’d processed a lot of concentrates at home. Periodically, I’d test the safety pan to see how I was doing, and I rarely found anything more than black sand in there.
Figure 11. Small green finishing pan with very limited bottom.
Again, after attending the recent gold show in my area, I’ve come home with a new favorite. It’s another blue Keene pan, only smaller. It has five regular riffles and 15 micro-riffles, and the bottom is almost six inches across. I brought home a bucket of concentrates from the Little North Fork of the Santiam River right after the Salem show, and I was really pleased testing this pan. It felt very comfortable, and I was able to work the whole bucket easily.
Figure 12. Small ten-inch finishing pan from Keene.
Square Pans

Figure 14. 14-inch square pan.
I never really grew to love either of my square pans. I don’t know if they’re just too non-traditional or if I just didn’t like the feel. There isn’t any swirling with these square pans – you just work the riffles continually, pulling back to re-stratify and then back at it.
Copper Pans
Since I don’t work with mercury, I haven’t had the urge to get a nice copper pan, but I’m weakening. I have a small, four-inch copper pan that is nice for display purposes, and it’s getting a pretty cool patina to it after six years. I’ll probably add a bigger copper pan to my collection at some point, just to have one. I think they’re beautiful, but I can’t imagine they’re much good in a panning tub.
Summary
So, if the question is, “How do I choose the right gold pan?” then what’s the answer? Well, it depends on how you answer these questions:
· What’s your budget?
· Have you bought a new pan lately?
· Do you have a full assortment of pans?
· Do you like to experiment?
Whatever your next pan is, I’m sure it will be the right one. And remember – the problem isn’t too much black sand – the problem is not enough gold.
Garret Romaine writes from Portland, Oregon. He’s always looking for more friends on Facebook.


1 comment:
Banjo pan isn't good?
Post a Comment